Import a char 3DSMAX
Check if it can be imported properly
Unreal wants to have only one root bone when importing skeletal meshes.
The FBX importer executes the following steps:
- Get the mesh object
- Get the Skin modifier on the mesh object and lists all bones assigned to it
- For each of the bones above it gets the parent item and checks if the item is of type: Bone or Mesh or Helper. Any other object type (example: shape, spline) stops the navigation. If you have other object types you are most likely to get an error when importing like:
 FBXImport:Error: Error Multiple roots are found in the bone hierarchy. We only support single root bone.
 FBXImport:Error: Error Multiple roots found
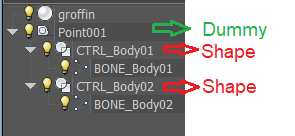
Example of objects in 3dsmax
In the example below we have two bones, connected to two controllers, connected to a common root dummy object.
This will not work as the navigation of the UE importer will stop on the Shapes.
There are two possible solutions:
- if the shapes are high enough in the hierarchy, try to convert those shapes in editable meshes, and then try to import. NOTE: in this case do not Export->Selected on the main mesh or the FBX will not contain the other shapes you converted to meshes.
- if the shapes are really in between bones, the convertion to meshes may not be enough. In this case you need to swap the shapes with dummy (Point display as box).
- You need to create a dummy object
- Align the dummy object with the shape you want to replace
- copy the keyframe of the shape in the Curve Editor selecting the Trasform track, and then paste it in the curve editor of the dummy
- in case there are child and father objects, under Hierarchy disable all inheritance for position/rotation/scale
- only after previous step link your dummy with same child and father
Checklist for successful import:
- You cannot import a skeleton by itself, if you export only the skeleton from max with FBX, UE will import nothing, you need some geometry associated
- Check if you have one root element at the top of your hierarchy which holds all your bones (even through other intermediate objects). Moving that object will move the whole geometry for your char.
- Check the name of this root element. It cannot be "root", name it something else.
- Check if starting from each bone and going up in the hierarchy you have only objects of type Bone or Mesh or Helper. If you have any other object type you need to convert it
Import a char
Procedure for a full character:
- Open the base rig file in 3DSMAX
- Check if you have any Shape or Spline (see above) objects into the hierarchy of your bones. If yes, convert them to Editable Mesh.
- Check if you have all bones going up to a single root node, if not create a Helper Grid on the bottom of the char, call it CTL_Root_Char and parent to it all top levels with bones in them
- Hide Shapes, Cameras, Helpers. Leave only Geometry and Bones
- Delete or hide all meshes you don't want to export (example for base file leave only the face, see above)
- Select all geometry and bones (ctrl+A)
- File-> "Export Selected"
- use FBX export
- In the FBX export panel select Smoothing Groups, Preserve Edge orientation. Do not select "Animation". Under Units select "convert to centimeters". Up Axis: Y Up. with "Bake Animations" selected.
- Uncheck "Animations"
- Repeat the above for each piece (hair, hair1, hair2, torso, legs, arms, plate, ....)
- Open one animation file in 3DSMAX
- Do the same changes you did in the baserig files (example creation of CTL_Root_Char, parenting, and trasformation into meshes of shapes)
- Export as FBX, selecting all items as above
- Be sure to select "Animations" and "Bake Animations"
- From Unreal Editor, create a new folder for your character
- In the Content Browser, select Import and select your baserig exported file
- In the FBX import panel, select "Skeletal Mesh" and "Import Mesh", do NOT select any skeleton
This will produce in Unreal : a Skeleton object, a Skeletal Mesh object, the texures associated to the object.
- In the Content Browser, click Import and select one of your additional mesh files.
- In the FBX import panel, select the Skeleton you imported with the baserig in the dropdown "Skeleton".
- Repeat the last two steps for all your mesh pieces
- In the Content Browser, click Import and select your animation exported file
- Uncheck "Import Mesh" (Skeletal Mesh will disappear), and select the Skeleton you imported with the baserig in the dropdown "Skeleton".
This will produce in Unreal an "Animation Sequence" object.
- Doubleclick on the animation sequence imported and you should see your char moving.
If you see the char very small, then increase the scale factor when importing the FBX.
- Create a new character blueprint (derived from character) and add to it skeletal mesh components (Add Component) with all your pieces
Define how your char will be split
If you want your char to be made of modular pieces the best way seems to be to have each piece exported separately but based on a common skeleton. This means you will have to decide which pieces will change. In this case we are speaking of geometry changes, for example if you want to swap the torso piece with a plate armor piece, then this one has to be a separate mesh.
Your base char will be made only of the pieces you will never geometrically swap. In our case it's only the face.
Base piece containing only the face:
Then one mesh file in exported for each other piece, based on the same skeleton:


