Import a char Blender: Difference between revisions
Zweitholou (talk | contribs) mNo edit summary |
|||
| (20 intermediate revisions by 2 users not shown) | |||
| Line 1: | Line 1: | ||
As part of the overall port to unreal, all character models are being moved to blender and rerigged with the standard ue4 skeleton and ik setup. This allows for easy retargeting of animation from a blender master animation file onto all characters, significantly streamlining the process of adding new animations in the game. Here I will document the workflow to move characters from obj exports out of 3ds into blender, then prepare them to import into unreal and retarget animations from the master as well as blend multiple animations together. | As part of the overall port to unreal, all character models are being moved to blender and rerigged with the standard ue4 skeleton and ik setup. This allows for easy retargeting of animation from a blender master animation file onto all characters, significantly streamlining the process of adding new animations in the game. Here I will document the workflow to move characters from obj exports out of 3ds into blender, then prepare them to import into unreal and retarget animations from the master as well as blend multiple animations together. | ||
[[File:Planeshift Character Setup (2).png]] | [[File:Planeshift Character Setup (2).png|1200px]] | ||
The first few steps are already completed for all existing character models | The first few steps are already completed for all existing character models. | ||
===== Importing the humanoid character template ===== | |||
We store the template in \ueart\characters\Base Animations\UE4_Mannequinn_Template_planeshift.blend | |||
1) This template can be exported fully to UE, the settings for export are the same as described below. Importing this will create a Skeleton in UE (ex.: UE4_Mannequinn_Template_planeshift_Skeleton) | |||
2) Go to Retarget Manager, add Current Skeletal Mesh and "Set Up Rig" as Humanoid. | |||
3) Save Preview Mesh in the Skeleton. | |||
4) Only for the humanoid character template which is using ALS, we need to add the virtual bones: | |||
Create the Virtual bones for your character '''BEFORE''' retargeting (doing it after will cause issues): | |||
{| class="wikitable" | |||
|- | |||
! Source !! Target !! VB Name | |||
|- | |||
|hand_l ||ik_hand_gun ||LHS_ik_hand_gun | |||
|- | |||
|LHS_ik_hand_gun ||ik_hand_r ||LHS_ik_hand_r | |||
|- | |||
|hand_r ||ik_hand_gun ||RHS_ik_hand_gun | |||
|- | |||
|RHS_ik_hand_gun ||ik_hand_l ||RHS_ik_hand_l | |||
|- | |||
|ik_foot_l ||foot_l ||ik_foot_l_Offset | |||
|- | |||
|ik_foot_l ||calf_l ||ik_knee_target_l | |||
|- | |||
|ik_foot_r ||foot_r ||ik_foot_r_Offset | |||
|- | |||
|ik_foot_r ||calf_r ||ik_knee_target_r | |||
|- | |||
|ik_foot_root ||foot_l ||foot_target_l | |||
|- | |||
|ik_foot_root ||foot_r ||foot_target_r | |||
|- | |||
|root ||root ||Curves | |||
|} | |||
===== Get the scale of the Blender scene right ===== | |||
We experienced a number of issues with the scale of models in Blender when exported to UE. The problem arise when your root bone in UE shows scaled up 100 times, this seems to mess up sockets attachments. | |||
The two setup which are working for us are the following: | |||
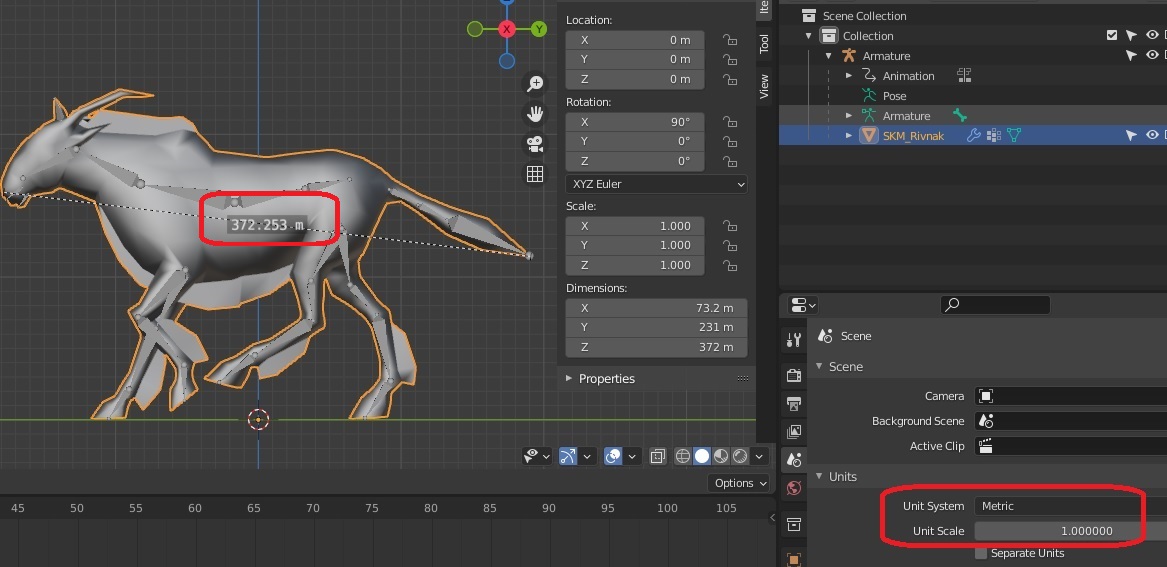
1) The blender scene is setup with Meters as unit of measure and scale as 1.0. With measurement tool you see the size of your char in meters * 100 , so a human 170 meters (or a horse 370 meters long). | |||
[[File:Blender_scale1.jpg]] | |||
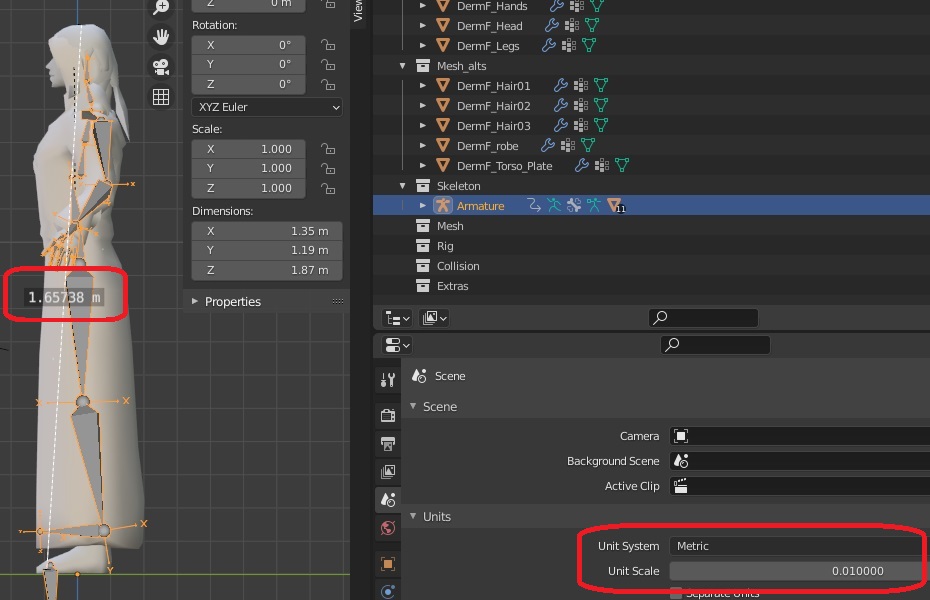
2) The blender scene is setup with Meters as unit of measure and scale as 0.01. With measurement tool you see the size of your char in meters as you expect it to be, so a human 1.7 meters. | |||
[[File:Blender_scale2.jpg]] | |||
These two cases seems to result in a correctly imported character in UE and sockets will not bug out. | |||
===== Importing a single character ===== | |||
First, the geometry must be exported from 3dsMax as .fbx to preserve UV mapping for the existing textures. Bones do not transfer properly from 3dsMax to Blender due to the way Blender reverse engineers the .fbx format. | |||
Next, open blender and import the character model. Select character textures located in the ueart repository and assign them within blender, renaming materials and texture names in Blender for consistency. This is where normal maps, spec maps, and alpha information is added, which will transfer to unreal on export. | |||
Next, rig the character according to [[Character rigging]]. Once the editing of the mesh is complete, change the skeleton to pose mode and press Ctrl A, set as rest pose. Next select the mesh, then the skeleton in object mode, and press Ctrl-P, set parent armature with automatic weighting. Also make sure all parts of the mesh have an armature modifier set to the ue4 skeleton. | |||
The automatic weighting gives a good base but has errors with the module joints and occasionally with the way previous planeshift meshes have been modeled. Clean all weighting to match along edges of module joints and make sure the weighting is not too strong or dropping off too sharply. | |||
For the IK in game to work properly, you need to export the IK bones like ik_foot_r, ik_foot_l . Consider that the option below is excluding all the non deform bones, so the IK must be set as Deform bones. Check that these bones are actually not having any weight on the model. | |||
After module joint fixes are done, export the character to .fbx from blender with the following steps: | |||
* Select one mesh at a time (example Torso) and the Armature | |||
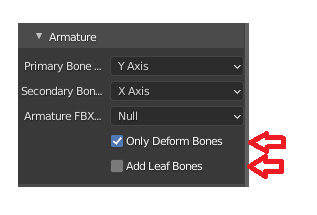
* Export FBX using "Selected only", "Only deform bones" and disabling "Add Leaf Bones". | |||
* Select Geometry -> Smoothing -> Edge (or you will get an error in UE of "no smoothing group information found") | |||
* Save the file in the /ueart repo under \ueart\characters\Kran\Modules\PSUnreal_Kran_arms.uasset | |||
* Name the file as per our [[Naming Conventions]] | |||
[[File:blender_export_skeletalmesh2.png]] | |||
[[File:blender_export_skeletalmesh1.png]] | |||
* Also if exporting animations uncheck "force start/end keying" so animations will all export to their own length. | |||
Import the FBX in Unreal, using Load the character asset into unreal and make sure the materials and textures are applying correctly. This should happen automatically on import. Set up the model for retargeting to a humanoid rig in unreal. | |||
[[File:blender_export_skeletalmesh3.png]] | |||
''' | '''NOTE:''' Every character uses the same base skeleton, but scaled to fit the model. When you import a skeletal mesh of a character in UE (except the Ylian male which is equal in scale to the template skeleton), the editor will modify the base skeleton (UE4_planeshift_Skeleton_GOOD), and you will see ALL characters gettting an offset on the root bone based on the difference between the template skeleton and the one you are importing. '''<u>DONT save that file</u>'''. The base skeleton should stay at scale 1. | ||
===== Importing animations ===== | |||
Bring in the blender animations from the master file and also any specific animations from the character file. Next, setup the animation blueprint for the master file and retarget it to each character. This is where animations are triggered and blended together. | |||
Read [[Character Animations]] for specs on frames and animation types needed. | |||
| Line 110: | Line 105: | ||
An example bipedal character may have: | An example bipedal character may have: | ||
1 head bone | 1 head bone | ||
1 neck bone | |||
1 | |||
4-6 spine bones | 4-6 spine bones | ||
2 bones per each arm | 2 bones per each arm | ||
1 bone for each hand (palm) | 1 bone for each hand (palm) | ||
3 bones for each finger | |||
2 bones per each leg | 2 bones per each leg | ||
| Line 123: | Line 117: | ||
Optional: | Optional: | ||
4 bones for the tail | 4 bones for the tail | ||
4 bones for each wing | |||
Various ik bones to help with rigging | |||
Article in progress - to be expanded with more information and step by step images as I go | Article in progress - to be expanded with more information and step by step images as I go | ||
Latest revision as of 20:37, 5 July 2024
As part of the overall port to unreal, all character models are being moved to blender and rerigged with the standard ue4 skeleton and ik setup. This allows for easy retargeting of animation from a blender master animation file onto all characters, significantly streamlining the process of adding new animations in the game. Here I will document the workflow to move characters from obj exports out of 3ds into blender, then prepare them to import into unreal and retarget animations from the master as well as blend multiple animations together.
The first few steps are already completed for all existing character models.
Importing the humanoid character template
We store the template in \ueart\characters\Base Animations\UE4_Mannequinn_Template_planeshift.blend
1) This template can be exported fully to UE, the settings for export are the same as described below. Importing this will create a Skeleton in UE (ex.: UE4_Mannequinn_Template_planeshift_Skeleton)
2) Go to Retarget Manager, add Current Skeletal Mesh and "Set Up Rig" as Humanoid.
3) Save Preview Mesh in the Skeleton.
4) Only for the humanoid character template which is using ALS, we need to add the virtual bones:
Create the Virtual bones for your character BEFORE retargeting (doing it after will cause issues):
| Source | Target | VB Name |
|---|---|---|
| hand_l | ik_hand_gun | LHS_ik_hand_gun |
| LHS_ik_hand_gun | ik_hand_r | LHS_ik_hand_r |
| hand_r | ik_hand_gun | RHS_ik_hand_gun |
| RHS_ik_hand_gun | ik_hand_l | RHS_ik_hand_l |
| ik_foot_l | foot_l | ik_foot_l_Offset |
| ik_foot_l | calf_l | ik_knee_target_l |
| ik_foot_r | foot_r | ik_foot_r_Offset |
| ik_foot_r | calf_r | ik_knee_target_r |
| ik_foot_root | foot_l | foot_target_l |
| ik_foot_root | foot_r | foot_target_r |
| root | root | Curves |
Get the scale of the Blender scene right
We experienced a number of issues with the scale of models in Blender when exported to UE. The problem arise when your root bone in UE shows scaled up 100 times, this seems to mess up sockets attachments.
The two setup which are working for us are the following:
1) The blender scene is setup with Meters as unit of measure and scale as 1.0. With measurement tool you see the size of your char in meters * 100 , so a human 170 meters (or a horse 370 meters long).
2) The blender scene is setup with Meters as unit of measure and scale as 0.01. With measurement tool you see the size of your char in meters as you expect it to be, so a human 1.7 meters.
These two cases seems to result in a correctly imported character in UE and sockets will not bug out.
Importing a single character
First, the geometry must be exported from 3dsMax as .fbx to preserve UV mapping for the existing textures. Bones do not transfer properly from 3dsMax to Blender due to the way Blender reverse engineers the .fbx format.
Next, open blender and import the character model. Select character textures located in the ueart repository and assign them within blender, renaming materials and texture names in Blender for consistency. This is where normal maps, spec maps, and alpha information is added, which will transfer to unreal on export.
Next, rig the character according to Character rigging. Once the editing of the mesh is complete, change the skeleton to pose mode and press Ctrl A, set as rest pose. Next select the mesh, then the skeleton in object mode, and press Ctrl-P, set parent armature with automatic weighting. Also make sure all parts of the mesh have an armature modifier set to the ue4 skeleton.
The automatic weighting gives a good base but has errors with the module joints and occasionally with the way previous planeshift meshes have been modeled. Clean all weighting to match along edges of module joints and make sure the weighting is not too strong or dropping off too sharply.
For the IK in game to work properly, you need to export the IK bones like ik_foot_r, ik_foot_l . Consider that the option below is excluding all the non deform bones, so the IK must be set as Deform bones. Check that these bones are actually not having any weight on the model.
After module joint fixes are done, export the character to .fbx from blender with the following steps:
- Select one mesh at a time (example Torso) and the Armature
- Export FBX using "Selected only", "Only deform bones" and disabling "Add Leaf Bones".
- Select Geometry -> Smoothing -> Edge (or you will get an error in UE of "no smoothing group information found")
- Save the file in the /ueart repo under \ueart\characters\Kran\Modules\PSUnreal_Kran_arms.uasset
- Name the file as per our Naming Conventions
- Also if exporting animations uncheck "force start/end keying" so animations will all export to their own length.
Import the FBX in Unreal, using Load the character asset into unreal and make sure the materials and textures are applying correctly. This should happen automatically on import. Set up the model for retargeting to a humanoid rig in unreal.
NOTE: Every character uses the same base skeleton, but scaled to fit the model. When you import a skeletal mesh of a character in UE (except the Ylian male which is equal in scale to the template skeleton), the editor will modify the base skeleton (UE4_planeshift_Skeleton_GOOD), and you will see ALL characters gettting an offset on the root bone based on the difference between the template skeleton and the one you are importing. DONT save that file. The base skeleton should stay at scale 1.
Importing animations
Bring in the blender animations from the master file and also any specific animations from the character file. Next, setup the animation blueprint for the master file and retarget it to each character. This is where animations are triggered and blended together.
Read Character Animations for specs on frames and animation types needed.
Number of Bones
An example bipedal character may have: 1 head bone 1 neck bone
4-6 spine bones 2 bones per each arm 1 bone for each hand (palm) 3 bones for each finger
2 bones per each leg 2 bones for each foot
Optional: 4 bones for the tail 4 bones for each wing
Various ik bones to help with rigging
Article in progress - to be expanded with more information and step by step images as I go


